
What is Aftershoot?

Aftershoot is an AI-powered software designed to streamline the photo culling and editing process for photographers.
The platform significantly reduces the time spent on these tasks with advanced algorithms that learn from your preferences. It’s particularly useful for handling large volumes of images, like at weddings and events.
One of its most notable features is AI culling. It uses AI to separate good-quality images from bad ones and assign them quality scores. From there, you make the final selections. This saves time by quickly identifying the best shots while reducing the overwhelming task of sorting through hundreds or thousands of images!
Then there are Aftershoot’s editing capabilities. With the click of a button, Aftershoot takes care of basic edits like cropping, straightening, and masking. These automated features prepare images for delivery much quicker without manually adjusting every photo.
The longer you use Aftershoot, the more it improves. The platform uses a learning algorithm to improve its selection and editing accuracy based on your unique editing styles!
Lastly, Aftershoot’s user-friendly interface integrates with popular editing software like Lightroom and Capture One. It also supports various file formats like RAW, JPG, and PNG.
Aftershoot is a valuable tool, particularly for photographers looking to optimize their workflow by minimizing tedious photo culling and editing tasks. Its AI tools boost efficiency and allow photographers to focus more on creative aspects of their work, like improving their service delivery and client satisfaction!
Who is Aftershoot Best For?
Aftershoot is useful for any photographer whose work involves humans as subjects. Its AI-powered culling and editing features are particularly effective for these types of images.
The platform is best for photographers who regularly deal with large volumes of photos, whether that's:
- Wedding photography
- Event photography
- Portrait photography
- Photojournalism
- Product photography
- Landscape photography
The software is especially valuable for professionals who:
- Need to process large batches of photos quickly.
- Want to reduce time spent on repetitive editing tasks.
- Want to streamline their workflow and increase efficiency.
- Seek consistency in their editing style across multiple images.
While Aftershoot benefits a wide range of photographers, it provides the most significant advantages to those who regularly handle high volumes of images and want to save time on culling and basic editing tasks.
Aftershoot Key Features
Aftershoot offers plenty of features that streamline the photo culling and editing process for photographers:
AI-Powered Culling
- Automated Selection: The AI detects and groups duplicate shots, photos with closed eyes, and blurry images.
- Customizable Preferences: Customize your culling preferences to match your needs.
- Adaptive Learning: The AI learns from your input and adapts its algorithms for future culls to improve accuracy over time.
AI-Assisted Editing
- Personal AI Editing Profiles: Aftershoot learns your unique editing style by analyzing your previously edited images.
- Pre-built AI Styles: Access over 28 premade editing profiles from the Marketplace for quick edits.
- Automated Adjustments: Get Aftershoot to crop, straighten, and adjust your photos automatically.
Workflow Integration
- Compatibility: Integrate Aftershoot with popular editing software like Lightroom and Capture One.
- Multiple File Formats: Supports leading formats like RAW, JPEGs, and PNGs.
- Flexible Import Options: Import images directly or work with existing Lightroom or Capture One catalogs.
Time-Saving Features
- Batch Processing: Edit unlimited images at no additional cost.
- Quick Culling: Process large volumes of images quickly (e.g., 1000 images in about 15 minutes).
- Continuous Improvement: Continuously train your AI profiles with each new edit for progressively more accuracy and consistency.
Combining these features significantly reduces the time you’ll spend on post-production tasks, allowing you to focus more on the creative aspects of your work.
How to Use Aftershoot
As someone who has used Photoshop for over five years, I wanted to try Aftershoot to see if it lives up to its claims.
Here’s how I used Aftershoot to import wedding photos and use AI to cull and edit my images automatically!
- Download Aftershoot & Create an Account
- Import Your Images
- Go to the Culling Tab
- Set Culling Preferences
- Start Culling
- Choose the Photos You Want to Edit
- Select the Editing Tab
- Explore the Marketplace for an AI Style
- Create a Custom AI Profile
- Toggle On/Off Your Final Edits
Step 1: Download Aftershoot & Create an Account
I started by going to aftershoot.com and selecting “Get Aftershoot.”
Step 2: Import Your Images

After downloading Aftershoot and signing in, I was welcomed to my home screen, where my edited photo albums would live.
I clicked “Create New Album” on the bottom right to import my RAW files.

Aftershoot took me to where I could click to import folders or drag and drop them onto the interface.

I uploaded a folder with wedding pictures.
Step 3: Go to the Culling Tab

The Culling tab was at the top. In this tab, I could get Aftershoot’s AI to review, cull, and reject photos automatically.
I selected the Culling Tab at the top and hit “Start Culling” on the bottom right.
Step 4: Set Culling Preferences
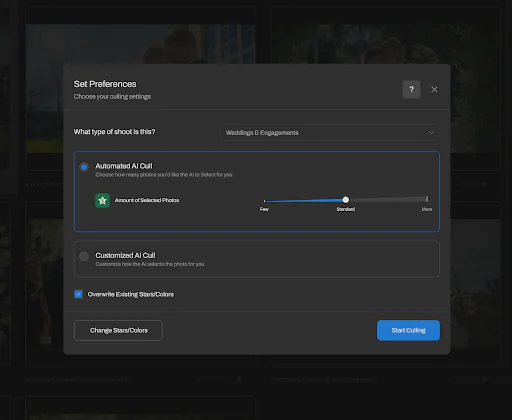
A new window opened where I could set my preferences. Aftershoot gave me two options for how I wanted to cull my photos:
- Automated AI Cull: Determine the number of photos I wanted the AI to select for me (few, standard, or more).
- Customized AI Cull: Choose how I wanted the AI to choose the photos for me.
- Highlight Photos (AI chooses the best photos).
- Duplicate Photos (AI groups photos into similar sets).
- Blurry Photos Detection (AI will identify and mark blurry images).
- Closed Eyes Detection (AI will identify and mark images with closed eyes).
Step 5: Start Culling

It was nice that Aftershoot gave me the option to be more specific with my photo culling. However, I wanted to keep things simple, so I kept it on “Automatic” and “Standard.” Then, I hit “Start Culling.”
Aftershoot began automatically culling my photos! In other words, the AI began analyzing my photos and examining things like focus, exposure, and facial expressions to determine which images were best.
The process didn’t take too long (only 14 seconds!) because I didn’t upload many photos. The more images you import, the longer it’ll take. But trust me, it's way better and faster than squinting at your screen for hours!

Once complete, Aftershoot categorizes the images into what it thinks are the best shots. The AI accurately identified the photos with closed eyes, sorting the good-quality photos from the bad ones!
It's pretty good at weeding out the obvious duds (the blurry shots or the ones where someone's blinking), but it's not perfect. I recommend doing a quick scan through them.
You’ll also notice the star rating system. Aftershoot uses a 1-5 star rating, which is really helpful.
I usually keep the 4 and 5 star shots, delete the 1 and 2 stars, and then review the 3 stars manually. You may still want to sift through the images with low ratings in case one of your favorite photos landed there!
Step 6: Choose the Photos You Want to Edit

I went through the photos and made my selections from the AI’s selections. I could select the photo and hit “D” on my keyboard or the small dot on the bottom right of the image.
Step 7: Select the Editing Tab

My final task was editing. I selected the Editing Tab next to the Culling Tab to access photo editing.

Within the Editing Tab, I started by selecting “Create New AI Profile.”
Step 8: Explore the Marketplace for an AI Style

I was presented with two options:
- Find a Pre-Built AI Style: Select a premade AI Style curated by professional photographers from the marketplace.
- Create a Custom AI Profile: Upload my own images and teach the AI to edit in my style.
I wanted to explore the Marketplace, so I selected “Find Pre-built AI Style.”
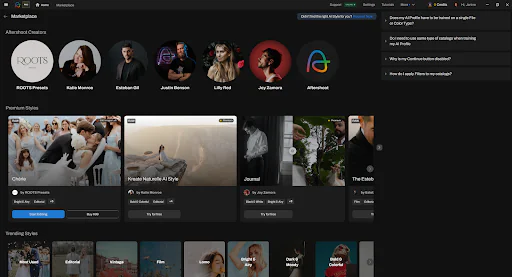
The Marketplace was organized by Creators and Styles. I could apply any of these styles for free by selecting “Try For Free” and “Start Editing.”
Back in my Editing Tab, I selected “Create New AI Profile” again.
Step 9: Create a Custom AI Profile
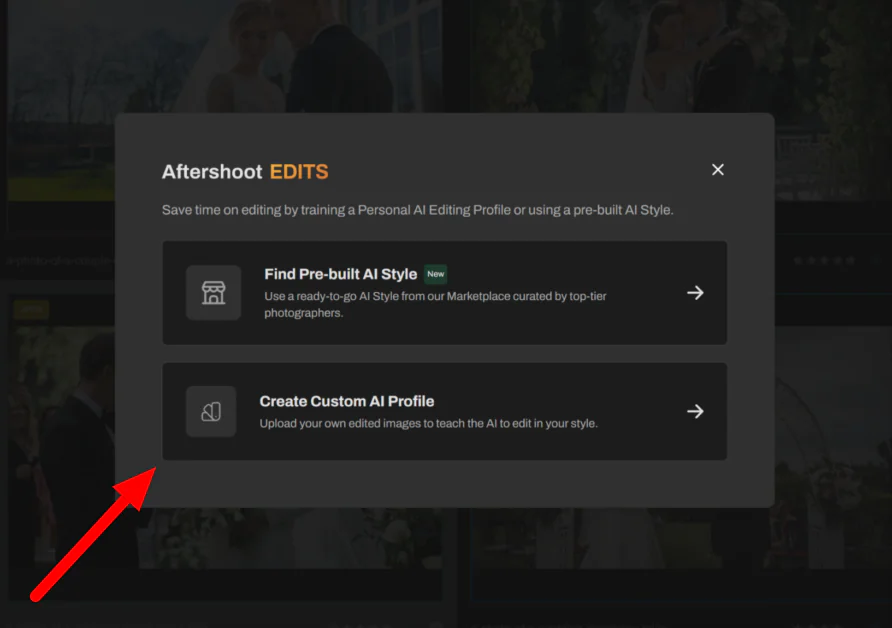
This time, I selected the second option: “Create New AI Profile,” to upload my own images and teach the AI a new style.

In the next window, I gave my profile a name and selected the image (RAW or JPEG) and color type (Color or Black & White). I hit “Continue.”

To Create a Custom AI Profile, I had to upload my Lightroom or Capture One Catalogs/Sessions containing images in the editing style I wanted to use.
The minimum is 2,500, but you’ll want to upload more for the best results. Aftershoot recommends uploading around 5,000.
Here are some additional tips on how you can create a personal AI editing profile:
- Upload a wide range of images with different lighting conditions and backgrounds. This will help the AI handle different types of images.
- Ensure your images have a consistent editing style for consistent edits.
Step 10: Toggle On/Off Your Final Edits

Back in the Editing Tab were some final AI edits Aftershoot would take care of automatically:
- AI Cropping
- AI Straightening
- AI Masking
All I had to do was turn the toggle on or off.

I could then use the filters to only edit the photos that I wanted.

Once I chose my style, edits, and filters, I hit “Edit” at the bottom and let Aftershoot’s AI do its thing!
Overall, Aftershoot exceeded my expectations by speeding up the entire culling and editing process. The AI's ability to quickly sort through large batches of images made my workflow significantly more efficient!
Top 3 Aftershoot Alternatives
Here are the best Aftershoot alternatives I’ve tried.
Skylum’s Luminar Neo
How to use Sky AI | Luminar Neo
The first Aftershoot alternative I’d recommend is Skylum’s Luminar Neo. I love Luminar Neo because of its powerful yet intuitive tools, which make even the most complex edits feel effortless!
Both platforms use AI to streamline photography workflows but serve slightly different purposes.
On the one hand, Aftershoot excels in speeding up the culling process. This makes Aftershoot better for photographers managing large batches of images, such as wedding or event photographers. Aftershoot also reduces editing time for basic tasks like cropping and straightening.
Meanwhile, Luminar Neo offers more advanced AI-powered editing capabilities. With Luminar Neo, you can use AI to replace the sky, retouch portraits, and enhance the details in photos. Luminar Neo caters more to photographers aiming for high creative control over their final product.
If you’re a photographer focused on culling large photo collections quickly, Aftershoot is the best choice. On the other hand, Luminar Neo is perfect for editing your photos with AI tools.


Trusted by Iraq’s top industries, BWER Company provides innovative weighbridge systems, enabling seamless load monitoring and weight compliance for transport, construction, and agriculture sectors.
Enhance your industrial operations with BWER weighbridges, designed for exceptional accuracy and durability to support Iraq’s growing infrastructure and logistics sectors.