Getting started with Vultr is actually quite simple if you know what you’re looking for.
Let’s take a deep dive into Vultr and see what actually makes it exciting.
From the very first moment that you visit the website, you are greeted by the certain packages Vultr specializes in.

But before we dive deep into the pricing, let’s analyze the signup process itself.
On the top right corner of the screen, click on sign up.

You’ll need to enter your email address alongside your password to get started.
Keep in mind that you have to confirm your email address, so ensure that it is fully legitimate.
Once you confirm your account and log in, you’ll need to enter credit card information if you want to get started.
Here’s the main screen you’ll be greeted by.

You have products, billing, support, affiliate, account, and Vultr docs on the left side of the screen.
The products tab showcases your instances, snapshots, ISOs, Scripts, DNS, Block Storage, Objects, Firewall, Network, and Load Balancers.
The Billing tab shows your added cards, so you can make a payment, shows your limits and your history.

On the next screen, you have the support tab, where you can open a ticket or review the frequently asked questions.

The affiliate tab is actually quite interesting, as you can essentially refer Vultr to friends and earn $10 per signup.
You are given a unique, randomly generated link that works only for you.

In the account tab, you’ll be able to view your profile, preferences, authentication, SSH keys, API, Users and Notifications.

The Vultr Docs lets you review all of their documents, and you can even sign up as a trusted author, request an article, and submit an article.
You have interesting and informative documents such as deploying a MERN application on Ubuntu 20.04 or creating Reverse DNS in the Vultr Control Panel, which is unique.
That’s all there is to sign up and getting started with Vultr, now let’s move on to the part where we set things up.
Vultr
Elevate your online presence with Vultr's high-speed, SSD-based hosting, optimized with the latest Intel processors. Its user-centric control panel and advanced features make it a suitable choice for businesses seeking reliable and stable performance.
Settings Things Up at Vultr
When you click on Products, on the Instances tab, you have a large, blue + sign on the screen’s right side.

Once you hover over it with your mouse pointer, you’ll have several options to pick from, including:
- Deploy New ServerThis is one of the main screens that you need to focus on initially.There are multiple servers that you can choose from; these include:
- Cloud Compute
This allows you to create powerful compute instances for your web application or development environment. You can pick from a wide variety of instances, which are charged per hour or on a monthly basis. - High Frequency
This is quite similar to the previous option, except that you get servers that are quite a bit faster and offer quite a bit more. - Bare Metal
This is a dedicated server with no virtualization. You stay in full control of your environment with high-performance, single-tenant dedicated servers. Bare metal servers give you access to the underlying physical server and feature no virtualization layer. These can power the most resource-intensive workloads as a result. At the time of writing, you only have the E3-1270v6 option.
 - Dedicated Cloud
This offers you dedicated resources, however, the unique aspect of Vultr is in the fact that you can rent 25%, 50%, 75%, or even an entire dedicated server. You can essentially never have the need to share resources if you do not want to. This is a unique approach and I find it genuinely interesting.
- Object Storage
The object storage option gives you the flexibility to add scalable storage on demand and manage it through the S3 API. You can essentially only have to pay for the data that you store or transfer out of your buckets.
- Block Storage
Block storage allows you to create expandable storage volumes and mount them directly from a compute instance.
 It is controlled through an API, flexible and scalable, and has a distributed design.
Question: Can I upgrade my block storage?Answer: Yes, and you can do so within the members area. Also, keep in mind that this will require a reboot of the instance in which your block storage is attached. - Load Balancers
Through load balancers, you can enable horizontal scaling and increase reliability on your applications within seconds. They are simple and easy to manage, and you can deploy fully configured cloud-based load balancers from the user-friendly customer portal.
- Cloud Compute
- Add Domain
As the name implies, you can add a domain to a DNS by entering the domain name and the default IP Address.

- Add Firewall Group
You can add a firewall group with a description.

- Add Load Balancers
In this menu, you can add the previously discussed load balancers by selecting a location, and seeing the load balancer configuration, and setting forwarding rules and health checks.

- Add Objects Storage
Here, you can add object storage and select a location as well as a label.

- Add Reserved IP
Here you can add a reserved IP

- View More Options

The view more options menu gives you an array of other features as well.
- Add Snapshot
You can upload a snapshot. However, it has to be in RAW format, not VMDK, QCOW2, and so on. The maximum uploaded snapshot size is 150 GB, and the snapshot has to support VirtIO Ethernet/Disk Controllers.

- Add ISO
Here, you can upload ISO from a remote machine.

- Add Startup Script
You can add a startup script, which is convenient in many situations.

- Add SSH Key
This menu allows you to add an SSH key.

- Add Block Storage
Last but not least, you can add block storage here.

With that out of the way, let’s deploy a new instance.
Learn more about Vultr:
Why use iPage?
Deploying Instances with Vultr
For the sake of this review, I’ll select the Cloud Compute option, but feel free to select what works best for your specific case.

Next, you’ll need to pick a location, and I’d recommend picking one that is either in the area of your target audience or near you, depending on your needs; I’ll go with Frankfurt in Germany for the time being.

Next, we’ll need to set up the server type.
Here you can make it either a 64 bit OS or a 32 bit OS. Honestly, at the time of writing, 64 bit makes the most sense, so I’ll pick that.
In terms of OS, I’ll use CentOS, but you can choose from the following:
- CentOS
- Debian
- Fedora
- Fedora CoreOS
- FreeBSD
- OpenBSD
- Ubuntu
- Windows

Next you’ll need to pick the server size.
Now, I’m not that keen on spending, and I’m testing things out, so I’ll go with the $5 plan. Keep in mind that you can pick whatever you need here.

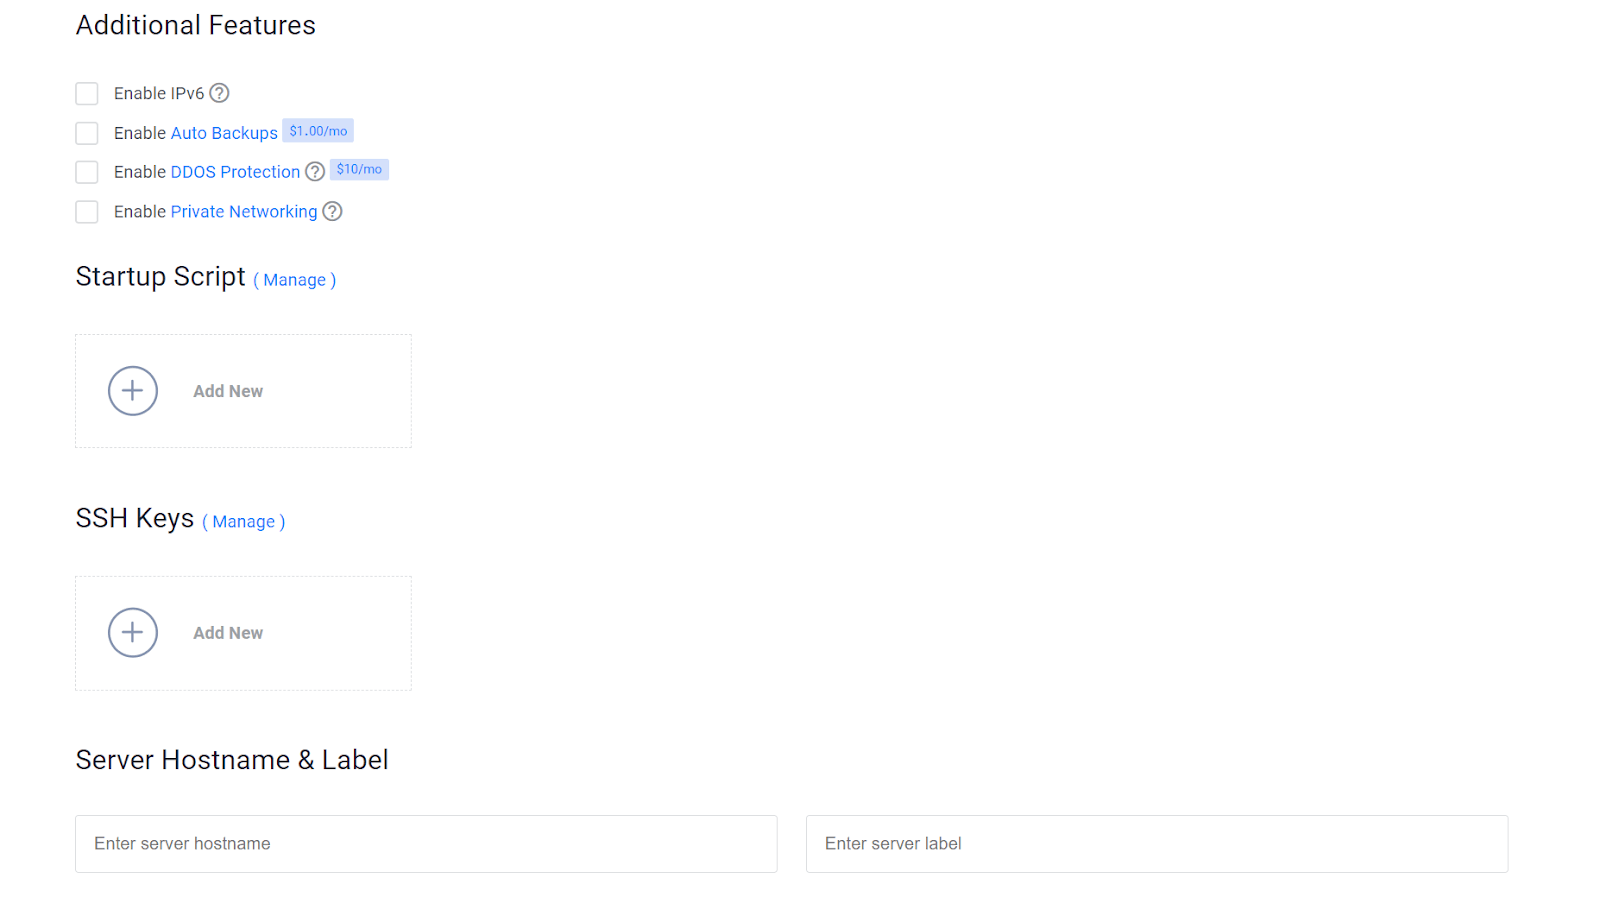
Last but not least, you can enable additional features, such as IPv6, Auto Backups, DDoS protection, and private networking.

You can also add startup scripts, SSH keys, and server hostname and label.
You’ll see the total cost on the very bottom of the screen and the deploy now button.

Click on deploy now to get started.
Your server will now be active, and the software will begin installing.

Once it’s completed, you’ll see it running.

If you click on the three dots on the right side, you’ll be able to see additional features.

These include:
- Server Details
- View Console
- Server Stop
- Server Restart
- Server Reinstall
- Server Destroy
The one you’ll be using most of the time is the server details tab.

Here you’ll see information about the server, such as the IP address, username, password, CPU, RAM, Storage, Bandwidth, Label, Tag, OS, and charges.
Now, here you’ll have access to features such as the overview, but you can also see the usage graphs, settings, snapshots, backups, and DDoS.
As we move on to the Usage Graphs, you can review your monthly bandwidth.

On the settings tab, you can see a lot of things.

Most notable ones being the public network information, such as the address, netmask, gateway, and reverse DNS.
You can create snapshots, enable backups, and enable DDoS protection as well.
Now, through the console, you can basically do anything you want to with your server.

In terms of other features, you can also deploy apps in a single click, and these include CentOS Web panel, cPanel, Docker, Drupal, GitLab, Jitsi, Joomla and much more.

With that out of the way, let’s try and terminate the server.
On the top right corner of the screen, click on Server Destroy.

You’ll have to check a little check box before clicking on Destroy Server.

You’ll now see the status of your server is at the “Destroying” phase.

Just wait for it to finish.
And that’s all there is to using servers.
Vultr
Elevate your online presence with Vultr's high-speed, SSD-based hosting, optimized with the latest Intel processors. Its user-centric control panel and advanced features make it a suitable choice for businesses seeking reliable and stable performance.
Level of Support
With that out of the way, let’s see the level of support.
I’ll open a ticket.

In order to open a support ticket, you’ll need to select a category, server, subject, and message.


Click on Open Ticket and you are good to go.
Keep in mind that regular hours are weekdays 9 AM to 6 PM EDT (1 PM to 10 PM UTC).

That’s about it.
Let’s talk about the refund policy for a second.
If you cancel any service prior to the expiration of the pre-paid fees, you understand, and agree that Vultr will not issue you any refund at all. This isn’t limited to any remaining pre-paid fees, set up fees, and special programming fees.
Instances that are in a stopped state continue to reserve dedicated system resources, such as RAM, SSD storage, IP aliases, CPU cores and so on, and therefore need to be charged, until the instance is fully destroyed. If you do not want to accumulate charges, you have to destroy the instance completely.
If you have funds in your account, and want to cancel or destroy the account completely, these will also not be refunded.


Your article helped me a lot, is there any more related content? Thanks!